Text Tags
Text tags insert text information into your forms, and they include the following:- Company Legal Name: This tag inserts your company’s legal name, as defined during your instance setup via the onboarding form your team completed. To update this information, contact your AI Insurance Account Manager.
-
Current Date: This tag inserts the date when the form is generated, meaning the date is set when the form is selected—not at the final “confirm” step of your flow. The date follows the
DD/MM/YYYYformat.
The Current Date is based on the policy’s timezone, which is set in the first step of creating the policy. It may not match your local timezone.
- Current Year: Inserts the year when the form is generated. The year is populated when the form is selected, not when it is sent or confirmed.
-
Effective Date: Inserts the date the user selects in the Effective Date field within the platform for a given flow. If no date is selected, the current date is used. The format is
DD/MM/YYYY. -
Policy End Date: Inserts the date the user selects in the Policy End Date field within the platform for policy flows. The format is
DD/MM/YYYY. - Policy Number: Inserts the policy number. If auto-generated by AI Insurance, it uses the system-generated ID. If manual entry is enabled, it uses the value entered by the user in the Policy Number field.
- Policy Premium: Inserts the total premium amount of the policy, excluding taxes and fees. The value is formatted as currency, with a ”$” symbol, comma separators, and two decimal places.
-
Policy Start Date: Inserts the date the user selects in the “Policy Start Date” field within AI Insurance for policy flows. The format is
DD/MM/YYYY. - Policy Type: Inserts the type of policy selected by the user in AI Insurance. Possible values include Claims Made, Claims Made “Nose” (Prior Acts), Occurrence, Claims Paid, Slot Coverage “Tail” (Reporting Endorsement), Slot Coverage—Occurrence, Slot Coverage—Claims Made, and Claims Made “Tail” (Reporting Endorsement).
- Primary Insured: Inserts the name of the primary insured in AI Insurance. Each policy must have one designated primary insured.
- Primary Insured Address: Inserts the primary insured’s address in AI Insurance. The address is displayed on a single line, with commas separating its components.
- Description of Operations: Inserts the Description of Operations for the selected insured when generating a Certificate of Insurance.
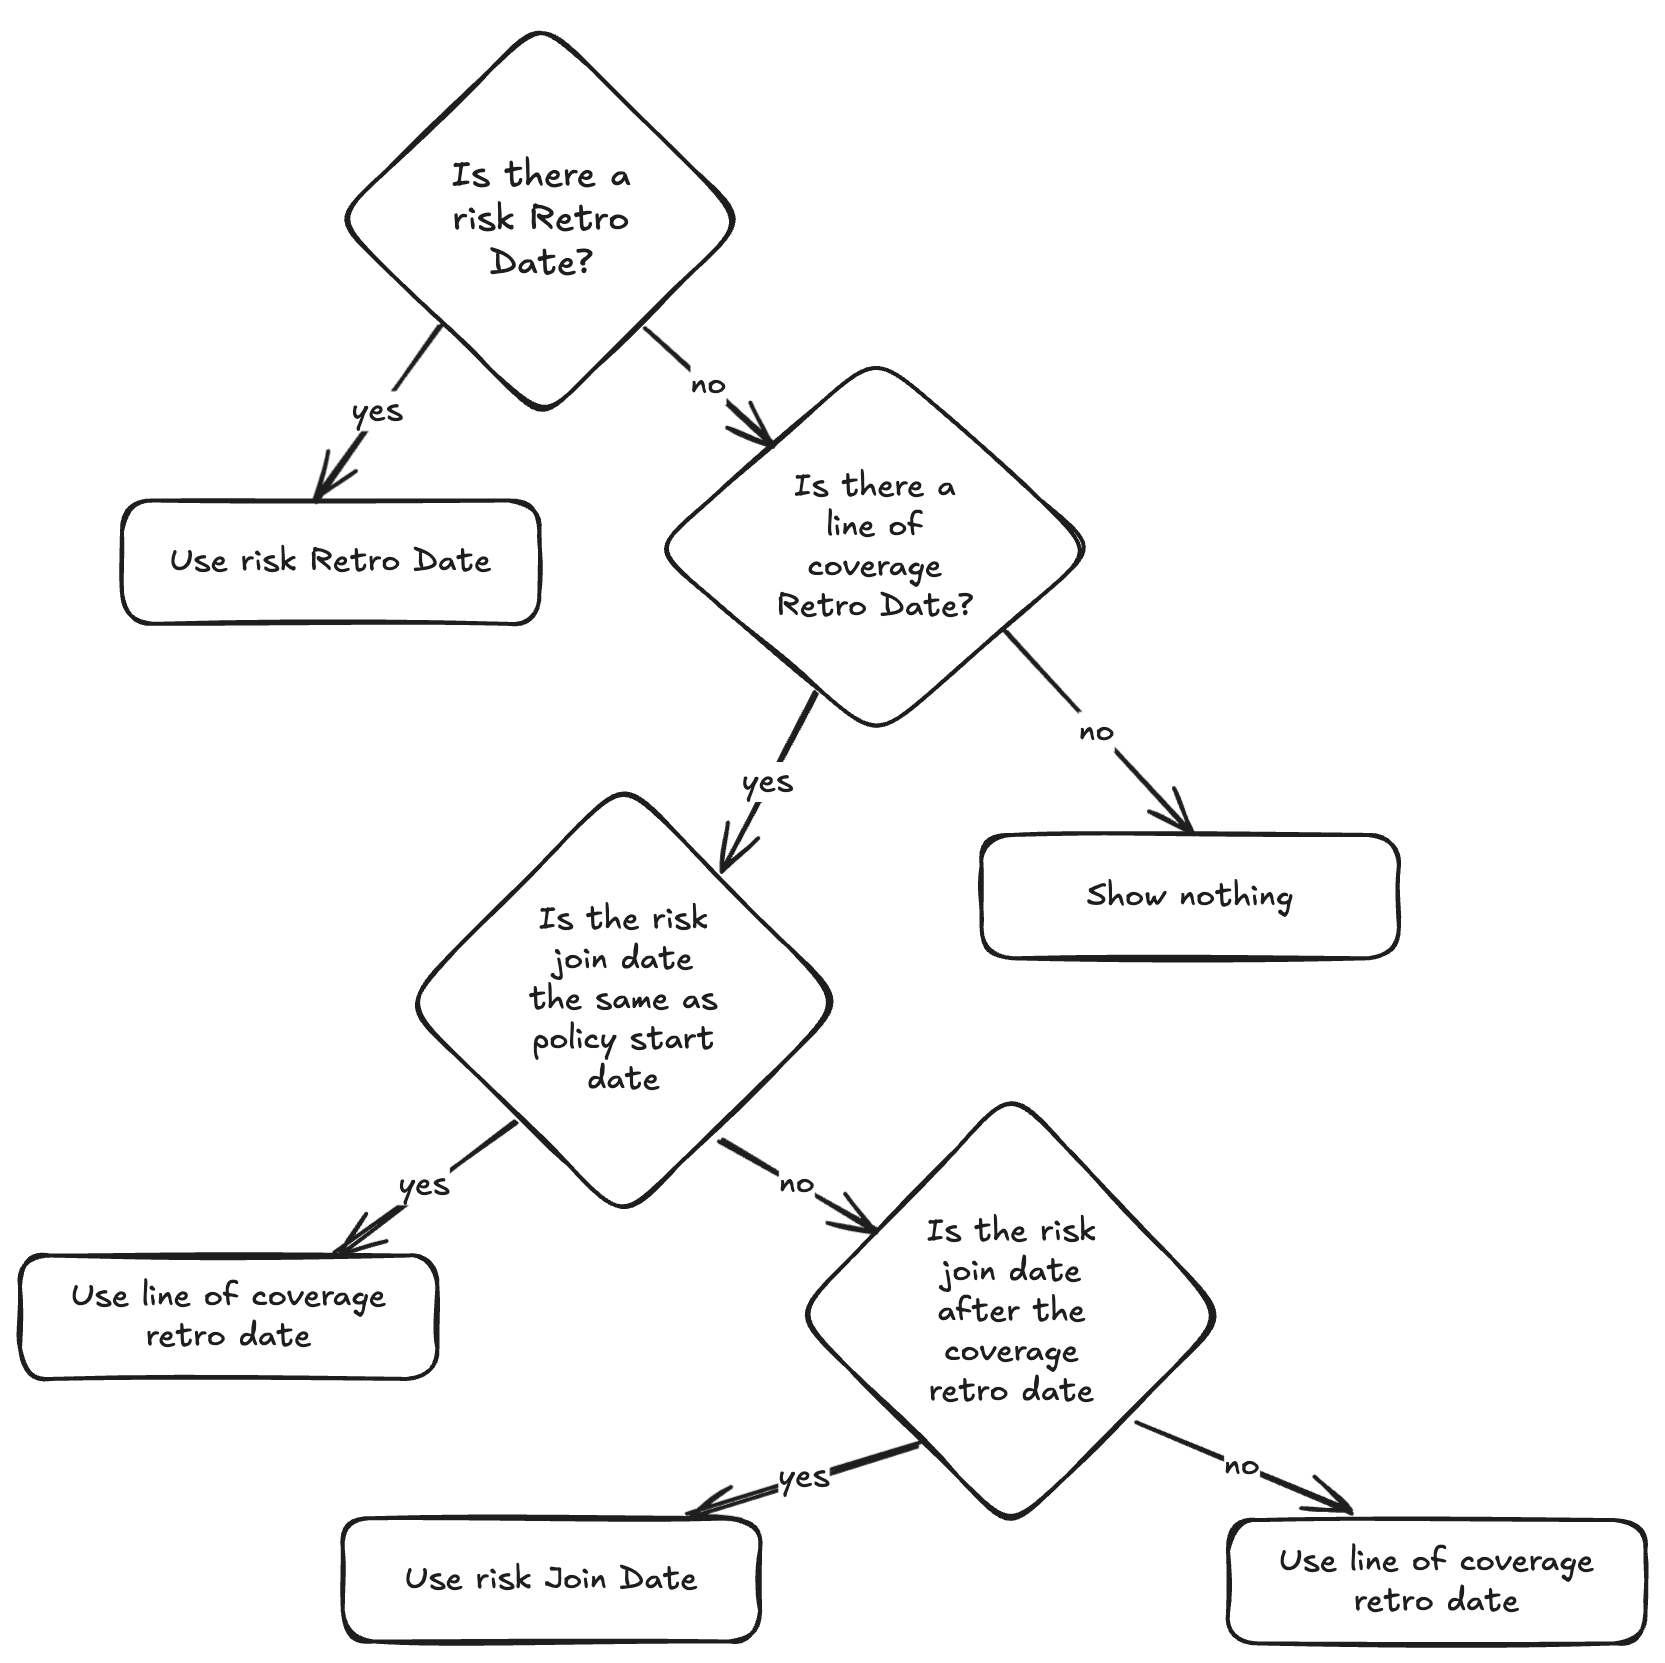
- Insured-Specific Limits: Inserts a table displaying the selected insured’s policy limits, deductibles, and retroactive dates when generating a Certificate of Insurance. If no insured-specific values exist, the default coverage limits, deductibles, and retroactive dates are used. If a customer uses a smart tag that pulls a risk-specific retroactive date, this flowchart shows how AI Insurance will set and display that date:
- Prior Policy Number: Inserts the policy number of the policy being renewed. It returns nothing if the tag is used in documents outside the renewal process.
- Timezone: Inserts the policy’s timezone, which is displayed in the format Country/City.
Table Tags
Table tags insert a table of information into your form. If there are no values, nothing will be inserted. Additionally, if an entire column has no values in any row, it will be omitted. Note: You cannot insert one Table tag inside another. Examples of table tags include:- Additional Insureds Schedule: Inserts a table where the first row contains column headers, and each subsequent row lists an “Additional Insured” from AI Insurance. You can customize the table columns by adding any tracked field related to the insured or policy-insured relationship, such as an address, Tax ID, or rating response.
- Billing Changes: Inserts a table whose first row contains column headers, followed by line items from the current policy bill, with the final row showing the total cost. The table includes the following columns: Item Name, Old Value, Change in Value, and New Value. This tag is typically used in endorsement documents.
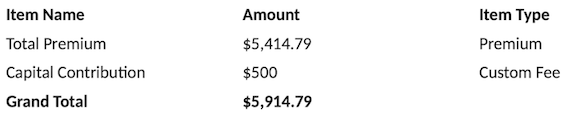
- Billing Details: Inserts a table whose first row contains column headers, followed by line items from the current policy bill, with the final row showing the total cost. The table includes the following columns: Item Name, Amount, and Item Type. This tag is typically used in initial policy documents. Item Types are pulled from the bill and can be “Premium,” “Taxes,” or “Fee.”
- Claim Details: This tag inserts a table listing every claim associated with an insured. It is available in Insureds forms, such as the Loss Run Report form. The table includes default columns that display claim information, and these columns can be customized by the customer to match their specific reporting needs. This tag is typically used in insured-specific reports and loss run documents.


- [Entity Type] Schedule: Every insured entity type in your instance will have a schedule tag. (This is automatic: if a new entity type is added, a schedule tag will be created for it.) These tags are available for policy-category forms. An [Entity Type] Schedule tag takes all insureds that are related to the policy in AI Insurance and finds the ones that are of [Entity Type]. It creates a table where the first row contains column headers, and the subsequent rows list out the matching insureds. Like other schedule tags, you can fully customize which columns are included. The example below shows the Company Schedule tag.

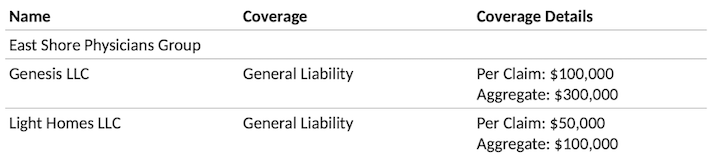
- Insureds Schedule: This tag combines the Additional Insureds Schedule and Named Insureds Schedule tags. It generates a table where the first row contains column headers, and each subsequent row represents an entity related to the policy in AI Insurance. You can customize the table’s columns to include any field tracked in the insured or policy-insured relationship, such as Address, Tax ID, Rating Response, etc. By default, the columns include Name, Coverage, and Coverage Details. This tag is typically used in initial policy documents.


- Named Insureds Schedule: This tag inserts a table whose first row contains column headers. Each subsequent row lists a designated Named Insured in your platform. You can customize the table’s columns to include any field tracked in the insured or policy-insured relationship, such as Address, Tax ID, Rating Response, and more. By default, the columns include Name, Coverage, and Coverage Details. This tag is typically used in initial policy documents.


- Policy Changes: This tag inserts a table summarizing five types of changes made to a policy:
- Insured(s) Added
- Insured(s) Terminated
- Insured(s) Updated
- Coverage Change(s)
- Policy Information Updated
In the above example, the only change made to the policy was the addition of a new insured, Alannah Simon.
-
Policy Coverage Details: This tag inserts a table displaying a breakdown of policy-level coverages and limits based on the “Edit Coverages” step in AI Insurance.
- The first row serves as the header, containing columns such as Coverage, Limits, and other policy-level details (e.g., Deductible, Retroactive Date, or Retention).
- As with other Table Tags, columns are included only if they contain a value for at least one row.
- Each subsequent row represents a specific line of coverage under the policy.
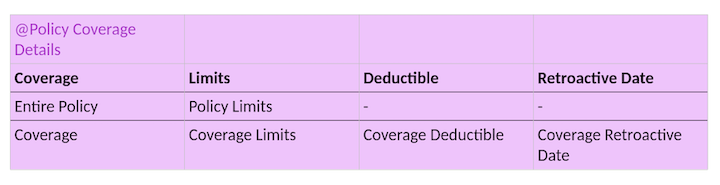
 NOTE: In the above example, the General Liability line of coverage has no listed Retroactive Date, and the Medical Professional Liability line has no deductible. The “Deductible” column would not appear if neither line had a deductible.
- Policy Forms: This tag inserts a table listing all forms attached to the policy. Each row contains the form’s name, and entries are separated by new lines.
- Event Reserve Updates: This tag inserts a table displaying reserve information for claims and incidents. It shows the current reserve amounts, expected totals, and paid amounts for both indemnity and ALAE (Allocated Loss Adjustment Expenses). This tag is only available for forms with the Claim/Incident category and can be used when editing forms within a claim or incident event.
The Event Reserve Updates tag will only appear when editing a form with the Claim/Incident Category. These forms can be created in the Company’s “Form” tab when viewing the company settings. Once created, they can be used within a claim/incident under the actions dropdown by selecting “Generate Claim Form” and choosing one of the templates. The tag can also be added when editing a generated form.
Action Tags
The Signature tag designates a form for digital signing. It is sent to the recipient specified in the Forms step of the policy creation flow.- In the quoting flow, the form is sent to the broker (if one exists); otherwise, it goes to the application submitter.
- Forms requiring a signature are sent in a separate email with a link to HelloSign.
- Once signed, the recipient’s signature and audit history are recorded.